文章目录
CentOS 下载链接:https://pan.baidu.com/s/1dPYs97Ew-Liz_chnkpV4kw
提取码:4kxf
UltraISO 中文破解版:https://blog.csdn.net/Asher117/article/details/93618082?spm=1001.2014.3001.5506
安装过程可参考:
- https://blog.csdn.net/qq_18945757/article/details/90033158?spm=1001.2014.3001.5506
- https://blog.csdn.net/qq_40309341/article/details/109513000?spm=1001.2014.3001.5506
如果是虚拟机的话可以参考????此篇。
添加用户超权限
参考: https://blog.csdn.net/qq_23327993/article/details/122063031
Linux 可以通过sudo 来动态赋予超级用户权限,但是对于先新增的用户不会默认赋予sudo 权力,如下报错:
xxx is not in the sudoers file.This incident will be reported.解决方法是修改文件/etc/sudoer 文件:
# 切换为超级用户su# 赋予文件"写"权限chmod u+w /etc/sudoers# 使用 vim 打开文件vi /etc/sudoers在root ALL=(ALL:ALL) ALL 后头添加
<userName> ALL=(ALL:ALL) ALL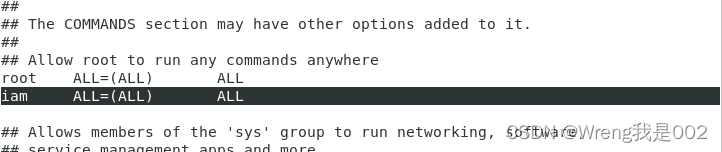
安装中文输入法
参考: https://blog.csdn.net/m0_37515193/article/details/101212159
安装 ibus-libpinyin
yuminstall ibus-libpinyin重启系统后,打开终端,重启 ibus
ibus restart打开设置 -> Region & Language,点击+,有这个 Chinese (Intelligent Pinyin) 的选项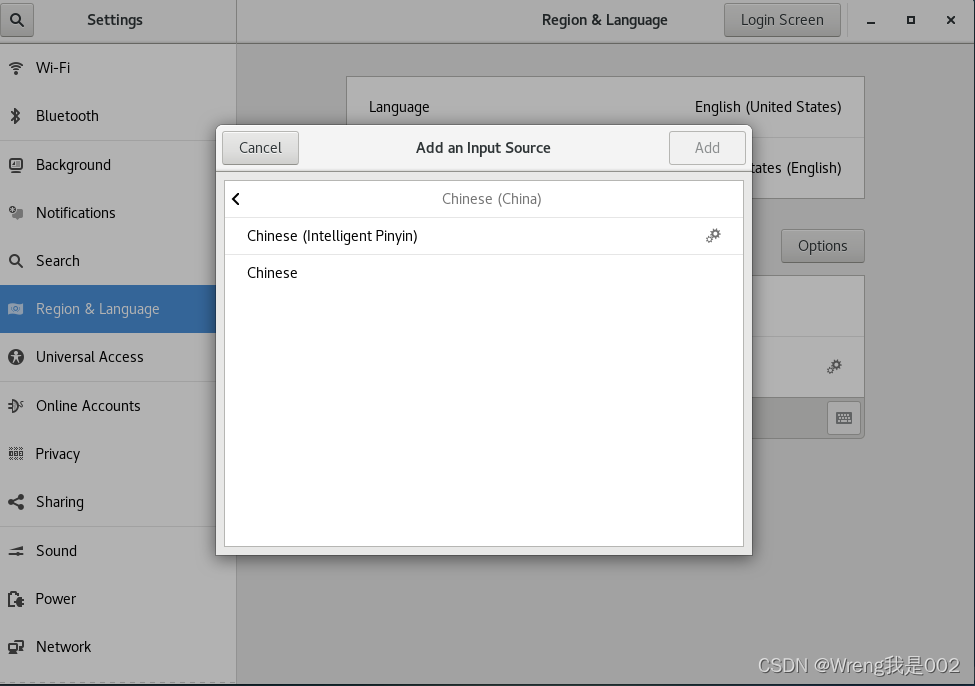
一切正常的话,就有
安装 vscode
vscode yyds,官方有相关的教程:
- https://code.visualstudio.com/docs/setup/linux
这个也可以参考一下:
- https://blog.csdn.net/yy345730585/article/details/89469513
执行以下代码:
sudorpm --import https://packages.microsoft.com/keys/microsoft.ascsudosh -c'echo -e "安装完成在终端输入code 即可启动 vscode。
VSCode 可以通过dnf 或yum 包管理器来安装更新,使用dnf 的指令如下:
sudo dnf check-updatesudo dnfinstall codeyum 的指令如下:
yum check-updatesudo yuminstall code安装 gcc/g++ 和 git
CentOS 7 自带的 gcc/g++ 和 git 的版本偏低了。gcc 4.8.5 是不支持 c17 特性,vscode 推荐 git 版本要大于 2.0(原自带的 git 是 1.8 的)。
参考: https://blog.csdn.net/b_ingram/article/details/121569398
这里是使用这个 SCL 软件集,SCL 提供包括 gcc, git, python 等多版本的软件包,且不同版本的切换也比较方便。
SCL ( Software Collections ) 是一个CentOS/RHEL Linux平台的软件多版本共存解决方案,为RHEL/CentOS Linux用户提供一种方便、安全地安装和使用应用程序和运行时环境的多个版本的方式,同时避免把系统搞乱。
参考:https://blog.csdn.net/A642960662/article/details/123076029
安装 SCL
# 超级权限用户su# 安装 SCL yuminstall centos-release-scl可以在以下网站查看 SCL 项目:
- https://www.softwarecollections.org/en/?spm=a2c4e.10696291.0.0.719919a4kVhmwD
- https://www.softwarecollections.org/en/scls/?search=&policy=&repo=&order_by=-create_date&per_page=10
查看安装哪些软件集
yum list all --enablerepo='centos-sclo-rh'> xxx.txt# 重定向输出查看已安装的软件
scl --list激活软件包
sclenable<scl-package-name><command><command>最常用的就是bash,即在当前的bash 生效,退出了当前的 shell 就失效了。
想要启动终端就激活软件包可以将source /opt/rh/<packName>/enable 写入到环境变量/etc/profile,即执行
echo"source /opt/rh/<packName>/enable">>/etc/profile参考:https://zhuanlan.zhihu.com/p/112764855
安装 gcc/g++ 10.2.1
# 进入超权限用户su# 安装开发工具集, 这里选择版本 10 yuminstall devtoolset-10# 激活对应工具集 sclenable devtoolset-10bash可以采用添加环境变量的方式在打开终端时激活devtoolset-10,也可以通过软链接的方式
# 可以先将原先的 4.8.5 版本的 gcc 改名掉ln -s /opt/rh/devtoolset-10/root/bin/gcc /usr/bin/gccln -s /opt/rh/devtoolset-10/root/bin/g++ /usr/bin/g++安装 git 2.27
卸载原先的 git,执行
sudo yum removegit通过 SCL 进行安装
yuminstall rh-git227设置软链接
ln -s /opt/rh/rh-git227/root/bin/git /usr/bin/gitln -s /opt/rh/rh-git227/root/bin/git-shell /usr/bin/git-shellln -s /opt/rh/rh-git227/root/bin/git-receive-pack /usr/bin/git-receive-packln -s /opt/rh/rh-git227/root/bin/git-upload-archive /usr/bin/git-upload-archiveln -s /opt/rh/rh-git227/root/bin/git-upload-pack /usr/bin/git-upload-pack安装完成后,会发现在 /opt/rh/ 目录下多了一个 httpd24 的目录,这个在使用git clone xxx 命令时需要使用到,因此需要进行激活,否则会报错:
errorwhile loading shared libraries: libcurl-httpd24.so.4: cannotopen shared object file: No suchfile or directory激活的命令自然就是:
sclenable httpd24bash推荐的一劳永逸的方式是写到 /opt/profile 中
echo"source /opt/rh/httpd24/enable">>/etc/profile安装 cmake 3.20
各个版本的 CMake 可以在这查看:https://cmake.org/files/
我们直接安装已编译好的版本(解压即可使用),执行
# 下载指定版本的cmakewget https://cmake.org/files/v3.20/cmake-3.20.0-linux-x86_64.tar.gz# 解压到指定路径 /opt/, 若想解压到当前路径,省去 -C /opt/tar -zxvf cmake-3.20.0-linux-x86_64 -C /opt/# 创建链接,注意必须使用绝对路径# [path to cmake] = /home/iam/Downloads/cmake-3.20.0-linux-x86_64/bin/cmakesudoln -s[path to cmake] /usr/bin/cmakesudoln -s[path to ccmake] /usr/bin/ccmakesudoln -s[path to cmake-gui] /usr/bin/cmake-guisudoln -s[path to ctest] /usr/bin/ctestsudoln -s[path to cpack] /usr/bin/cpack安装 Eigen 3.4.0
安装 Eigen 之前,需要完成 gcc 和 cmake 的安装。
Eigen 官网:https://eigen.tuxfamily.org/index.php?title=Main_Page
需要下载源码并进行编译安装
# 下载压缩包wget https://gitlab.com/libeigen/eigen/-/archive/3.4.0/eigen-3.4.0.tar.gz# 解压到当前路径tar -zxvf eigen-3.4.0.tar.gz# 进入解压中的文件cd eigen-3.40mkdir buildcd build# 编译安装 cmake..makeinstall默认的安装路径在/usr/local/include/eigen3,在使用的时候可以直接#include<Eigen/Dense> ,但在 VScode 中会显示报错(实际上是没问题的),使用#include<eigen3/Eigen/Dense> 可以解决报错问题。
测试代码:
test.cpp
#include <iostream> #include <eigen3/Eigen/Dense> using namespace std; using namespace Eigen; int main(int argc, char **argv) { Matrix2d A; A << 1,2,3,4; cout << "A=\n" << A << endl; return 0; }CMakeLists.txt
cmake_minimum_required(VERSION 3.10) project(eigenTest) include_directories("/usr/local/include/eigen3") add_executable(test test.cpp)终端执行:
ls# -> test.cpp CMakeLists.txtmkdir buildcd build cmake..make ./test安装 openCV 4.5.0
安装之前,需要完成 gcc, cmake 和 git 的安装。
参考:https://blog.csdn.net/qianbin3200896/article/details/117160054
首先,安装依赖项
sudo yum -yinstall epel-releasesudo yum -yinstall gtk2-develsudo yuminstall -y libpng-develsudo yuminstall -y jasper-develsudo yuminstall -y openexr-develsudo yuminstall -y libwebp-develsudo yum -yinstall libjpeg-turbo-develsudo yum -yinstall libtiff-develsudo yum -yinstall tbb-devel eigen3-develsudo yum -yinstall boost boost-thread boost-develsudo yum -yinstall libv4l-devel然后,下载 opencv 和 opencv_contrib 安装包(从码云下即可)
git clone https://gitee.com/binghai228/opencv.gitcd opencvgit checkout4.5.0# 选择分支cd..git clone https://gitee.com/binghai228/opencv_contribcd opencv_contribgit checkout4.5.0# 选择分支cd..分支选择完成后,将 opencv_contrib复制到 opencv 的目录下。
接着,下载 opencv_contrib 的 module 的部分缺失文件,可在此处下载:
链接:https://pan.baidu.com/s/1L5KHpbNxAI7BwB592cGX3g
提取码:qszy
把下载的文件放到opencv_contrib/modules/xfeatures2d/src。
最后,开始编译,执行:
cd opencvmkdir buildcd build将 opencv/modules/features2d 复制到这个 build 目录,执行
cmake -DCMAKE_BUILD_TYPE=Release -DCMAKE_INSTALL_PREFIX=/usr/local -DOPENCV_EXTRA_MODULES_PATH=../opencv_contrib/modules/ -DWITH_TBB=OFF -DWITH_CUDA=OFF -DBUILD_opencv_gpu=OFF -DBUILD_opencv_gpuarithm=OFF -DOPENCV_GENERATE_PKGCONFIG=ON..编译
make这个过程比较久,耐心等待。构建完成进行安装:
sudomakeinstall安装完成后,开始配置 opencv 库的可执行路径。
添加库路径:
ln -s /usr/local/lib64/pkgconfig/opencv4.pc /usr/share/pkgconfig/ ldconfig添加环境变量:
vi /etc/profile打开此文件,在文件某尾加上
export PKG_CONFIG_PATH=$PKG_CONFIG_PATH:/usr/local/lib64/pkgconfig export LD_LIBRARY_PATH=$LD_LIBRARY_PATH:/usr/local/lib64最后令其生效:
source /etc/profile接下来,进行 pkg-config 配置,默认的 pkg 搜索链接路径为 /usr/lib/pkgconfig,需要将 opencv.pc 拷贝到 pkg 的默认路径下:
cp /usr/local/lib64/pkgconfig/opencv4.pc /usr/lib/pkgconfig输入命令:
ldconfig重启以后,输入下面的命令查看当前 opencv 版本号:
pkg-config --modversion opencv4# 4.5.0CentOS 遇到的报错
用户超权限
错误提示:
xxx is notin the sudoers file.This incident will be reported.前面已有介绍,此处不在赘述。
yum 锁
参考:https://blog.csdn.net/Dan1374219106/article/details/112450922
错误提示:
Another app is currently holding the yum lock; waitingfor it to exit...解决方法:
rm -f /var/run/yum.pid然后重新运行之前的yum 命令。
CentOS U盘挂载问题
exfat 文件系统的 U 盘 centos 识别不了,比较的麻烦。参考:https://cloud.tencent.com/developer/article/1626805 ,建议格式改成 ntfs 的。
如果 ntfs 还是无法挂载,参考:https://blog.csdn.net/weixin_39917791/article/details/110578210。
热门文章
- 济南宠物狗(济南宠物狗寄养价格)
- 免费南非VPN | 2月23日21.5M/S|免费V2ray/SSR/Clash/Shadowrocket免费节点订阅分享
- 青浦二中高考成绩 青浦二中高考成绩查询
- 猫的三针疫苗叫什么(猫咪三针疫苗叫什么名字)
- 免费南非VPN | 2月27日18.1M/S|免费Shadowrocket/Clash/V2ray/SSR免费节点订阅分享
- 被猫抓了把血挤出来了并打疫苗(被猫抓了把血挤出来了并打疫苗可以吗)
- 2021年河南动物疫苗采购结果(2021年河南动物疫苗采购结果公告)
- 宠物医院仓鼠服务内容(宠物医院治仓鼠贵不贵)
- 动物疫苗知识点总结大全(动物疫苗的种类有哪些)
- 动物疫苗的保管注意事项不包括(动物疫苗需要冷藏吗)